

How to prevent laptop from connecting to Wi-Fi automatically on Windows 11
On Windows 11, whenever you configure a new Wi-Fi network profile by default, the system volition enable the option to connect automatically when the network is in range. Although this user-friendly feature makes connecting to the internet faster, information technology's not one that you need on every wireless network.
If y'all don't need to connect to specific networks automatically, Windows xi includes multiple ways to disable automated connections to wireless access points.
In this Windows 11 guide, nosotros will automatically walk you lot through the steps to prevent your laptop from connecting to the wireless access points automatically.
- How to stop automated Wi-Fi connection during setup
- How to finish automatic Wi-Fi connection using Settings
- How to stop automatic Wi-Fi connection using Control Panel
- How to end automatic Wi-Fi connexion using Command Prompt
How to cease automated Wi-Fi connection during setup
Although you lot can alter the settings subsequently adding a wireless network profile, you can besides disable automatic connections during the network configuration process.
Connect to a wireless network
To configure a Wi-Fi profile to never connect automatically, employ these steps:
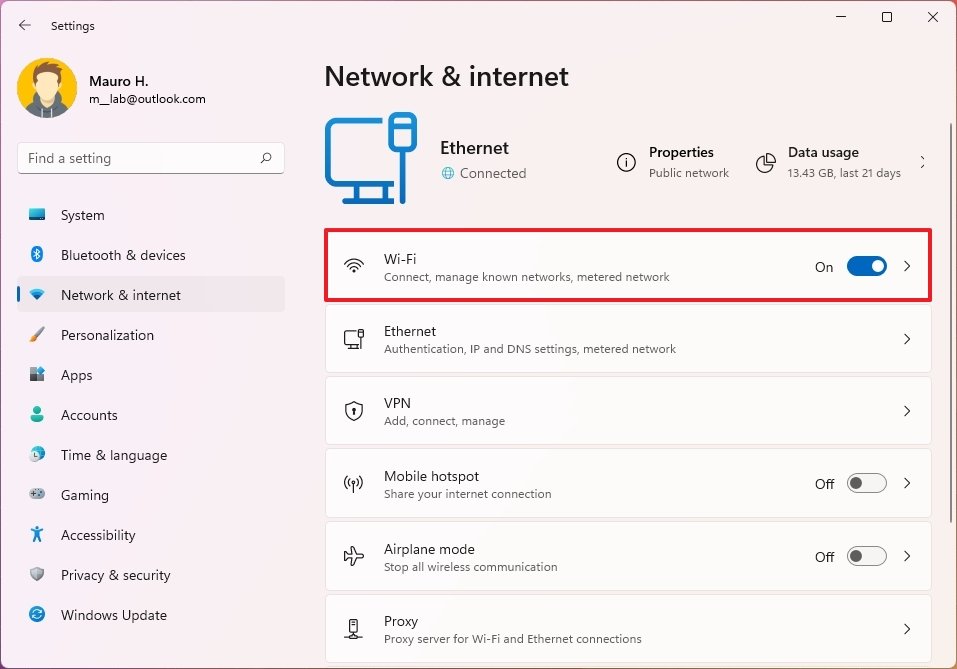
- Open Settings.
- Click on Network & internet.
-
Click the Wi-Fi page on the right side.
 Source: Windows Key
 -
Click the Evidence available networks choice.
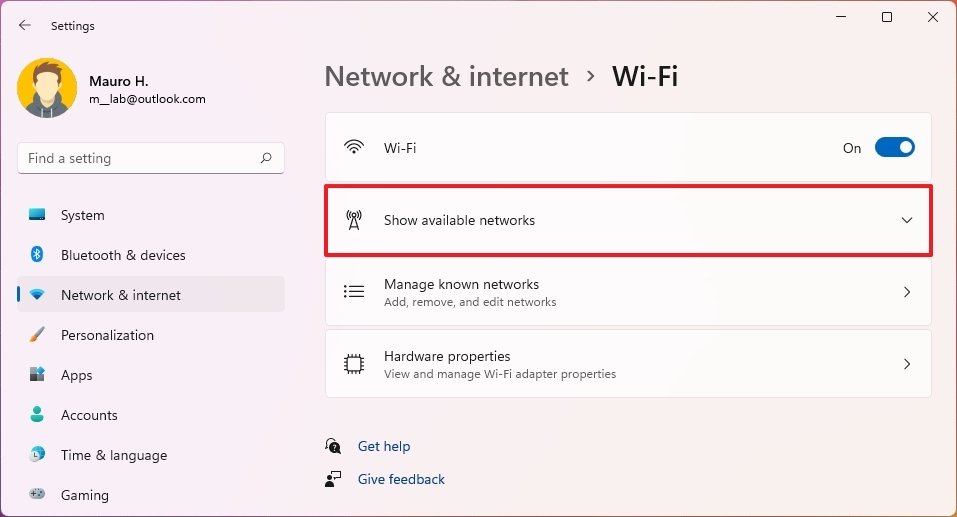 Source: Windows Cardinal
 - Select the access point to connect.
-
Clear the Connect automatically choice.
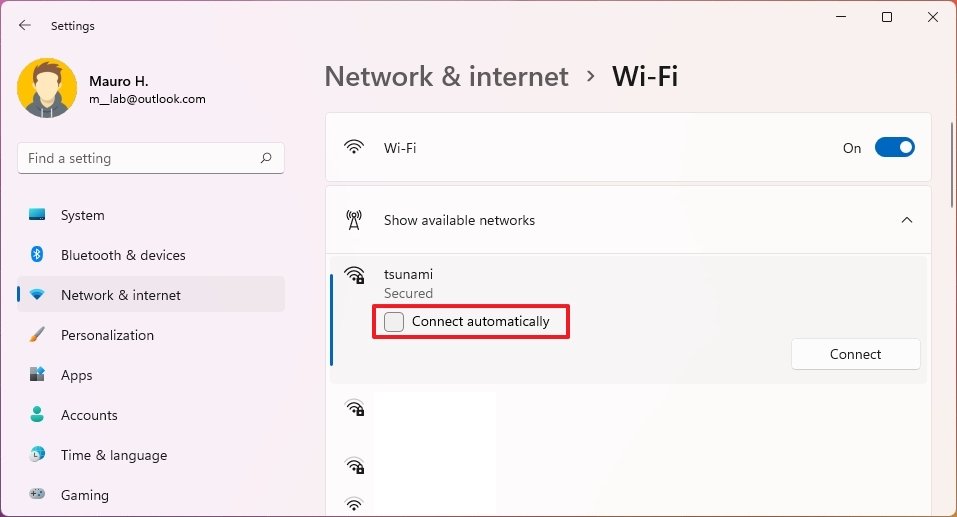 Source: Windows Central
 - Click the Connect push.
- Confirm the wireless network password.
- Click the Next button.


Prevision wireless network
To preclude automatic network connections while calculation a new Wi-Fi contour manually, use these steps:
- Open Settings.
- Click on Network & internet.
-
Click the Wi-Fi page on the right side.
Source: Windows Central -
Click the Manage known networks setting.
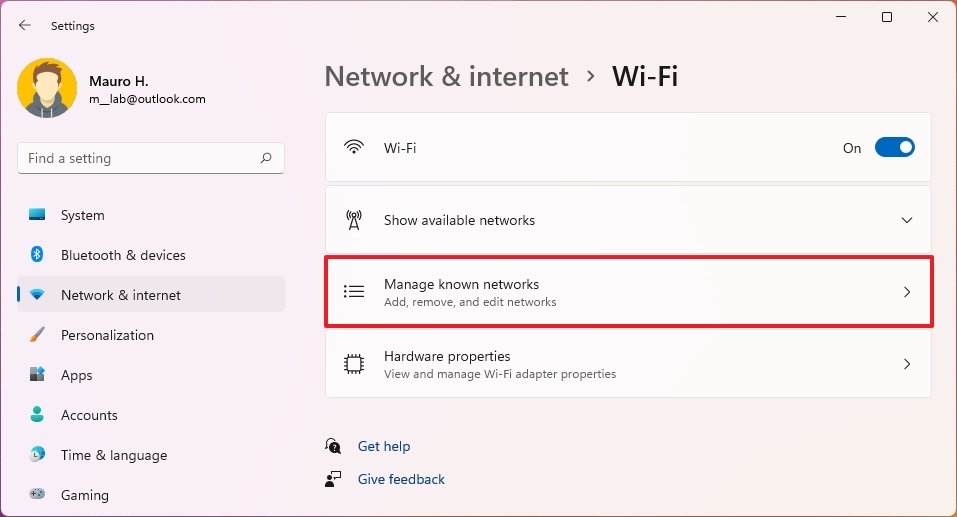 Source: Windows Central
 -
Click the Add together network push.
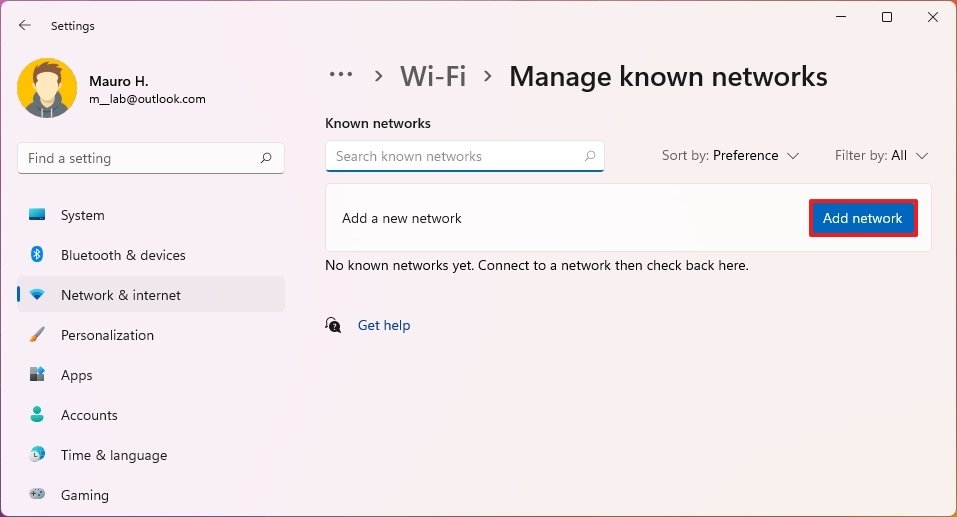 Source: Windows Key
 - Configure the Wi-Fi information, such equally network name and security type.
-
Clear the Connect automatically option.
 Source: Windows Central
 - Click the Save button.


In one case you complete these steps, Windows xi won't connect to the wireless network when it's in range.
How to cease automatic Wi-Fi connectedness using Settings
To stop Windows 11 from connecting to a Wi-Fi network automatically, use these steps:
- Open up Settings.
- Click on Network & internet.
-
Click the Wi-Fi page on the right side.
Source: Windows Fundamental -
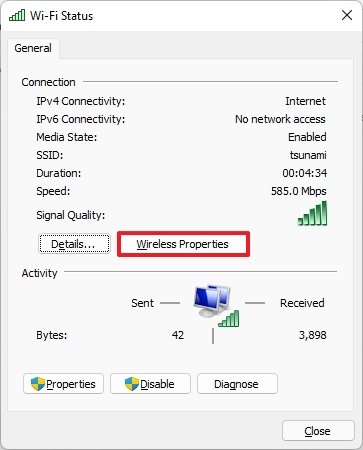
Click the wireless properties setting.
 Source: Windows Central
 -
Under the "wireless properties" section, clear the Connect automatically when in range selection.
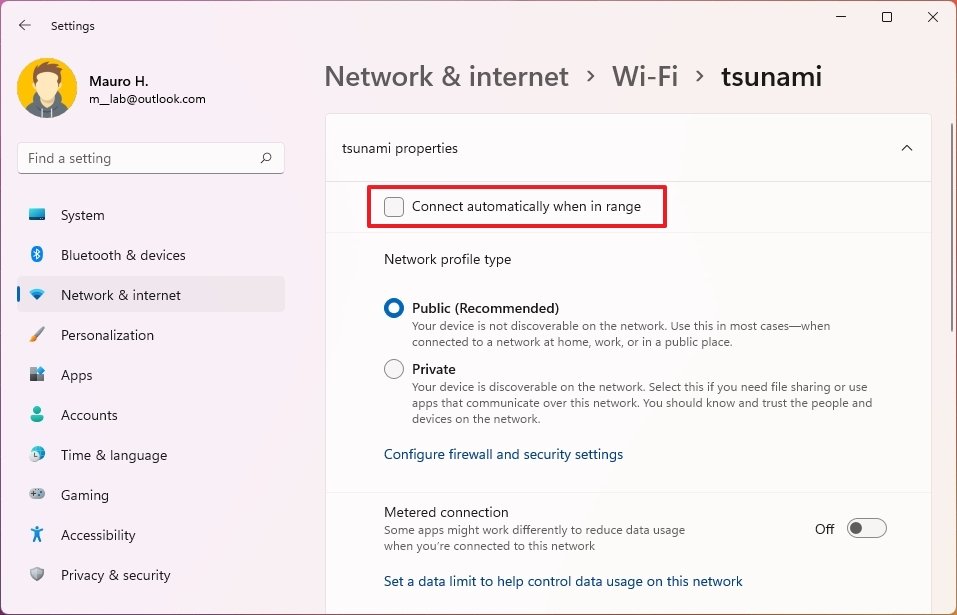 Source: Windows Fundamental


One time you consummate these steps, the laptop or desktop reckoner will no longer attempt to connect to the Wi-Fi network while it's in range.
How to stop automatic Wi-Fi connection using Control Panel
To preclude Windows 11 from connecting to the wireless access point through Control Console, use these steps:
- Open Command Panel.
- Click on Network and Internet.
-
Click the Network and Sharing Center on the right side.
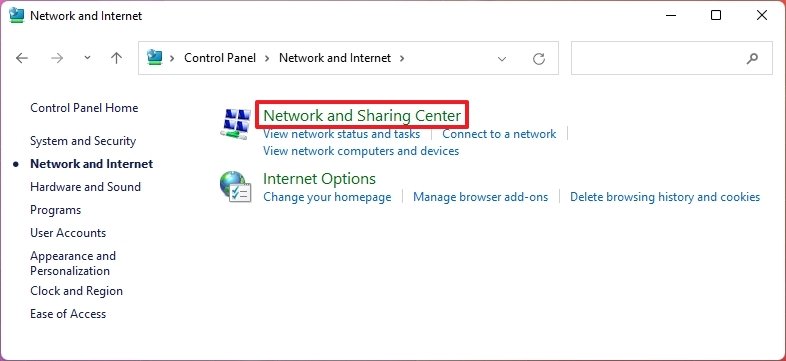 Source: Windows Central
 -
Click the Alter adapter settings option on the left pane.
 Source: Windows Central
 -
Correct-click the Wi-Fi adapter and select the Status option.
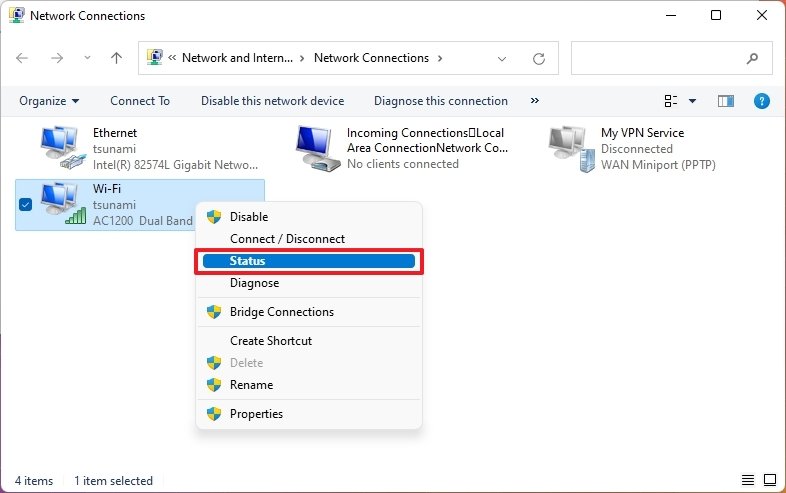 Source: Windows Primal
 -
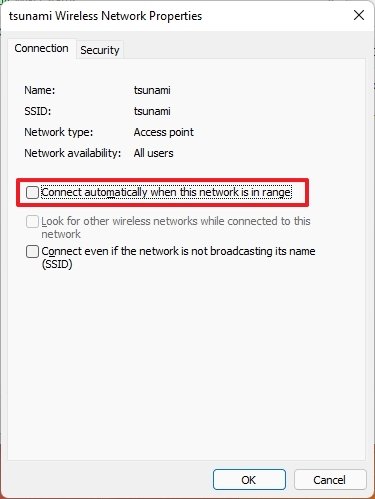
Click the Wireless Properties button.
 Source: Windows Key
 - Click the Connexion tab.
-
Clear the Connect automatically when this network is in range choice.
 Source: Windows Central
 - Click the OK push.
- Click the Close button.


After you consummate these steps, similar using the Settings app, Windows 11 won't connect to a wireless network.
How to finish automatic Wi-Fi connection using Command Prompt
To stop a wireless connectedness to admission an access point while in range with Control Prompt, use these steps:
- Open Get-go.
- Search for Command Prompt, correct-click the pinnacle issue, and select the Run as administrator selection.
-
Type the following command to decide the name of the wireless network to modify and press Enter:
netsh wlan show profiles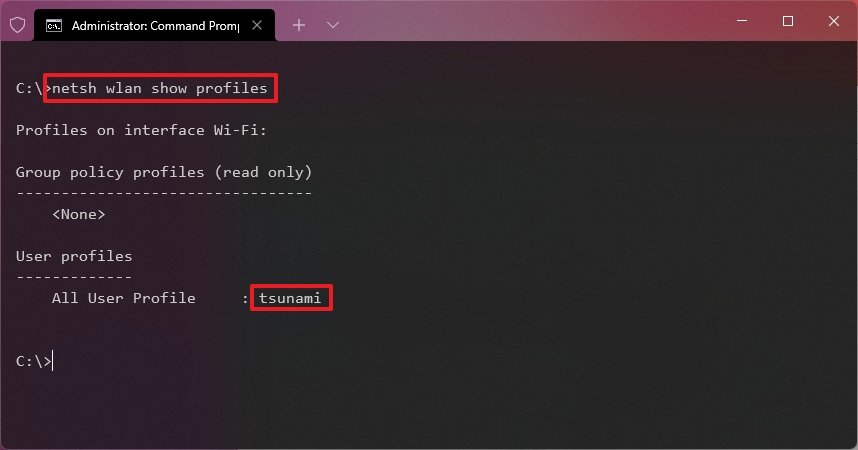 Source: Windows Primal
 - Ostend the proper name of the network profile.
-
Type the following command to disable automatic connection to the wireless network and press Enter:
netsh wlan prepare profileparameter name="wireless_name" connectionmode=manual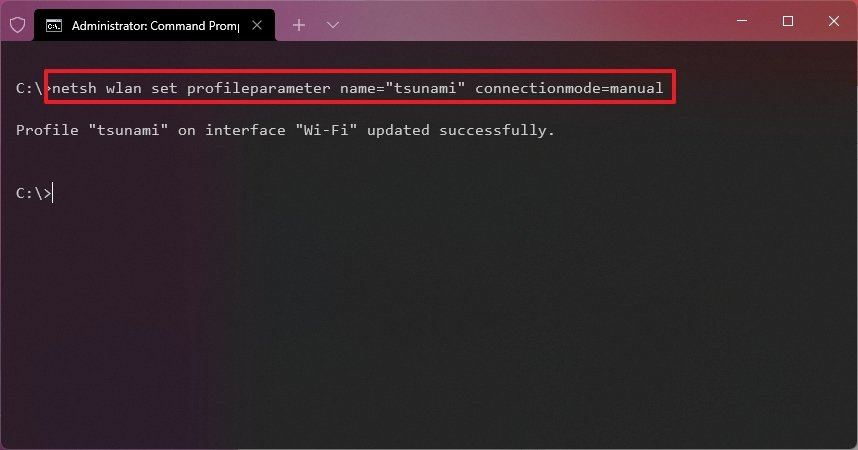 Source: Windows Central


After yous complete these steps, automatic connection to the wireless network you specified won't occur.
More Windows resources
For more helpful articles, coverage, and answers to common questions about Windows 10 and Windows xi, visit the post-obit resources:
- Windows 11 on Windows Central — All you need to know
- Windows xi help, tips, and tricks
- Windows ten on Windows Central — All you need to know

Shooty bang bang
Where are all the guns in Dying Light 2?
It's past design, sure, just there's a distinct lack of firearms in Dying Lite 2. For ameliorate or worse, mod medieval Villedor is a place to build your own weapons. But what happened to the guns and ammo and might it ever make a comeback?

Source: https://www.windowscentral.com/how-prevent-laptop-connecting-wi-fi-automatically-windows-11
Posted by: tylerhishadinin.blogspot.com
0 Response to "How to prevent laptop from connecting to Wi-Fi automatically on Windows 11"
Post a Comment